BMW F10 Side View Camera: A Concise Guide to Tackling Malfunctions
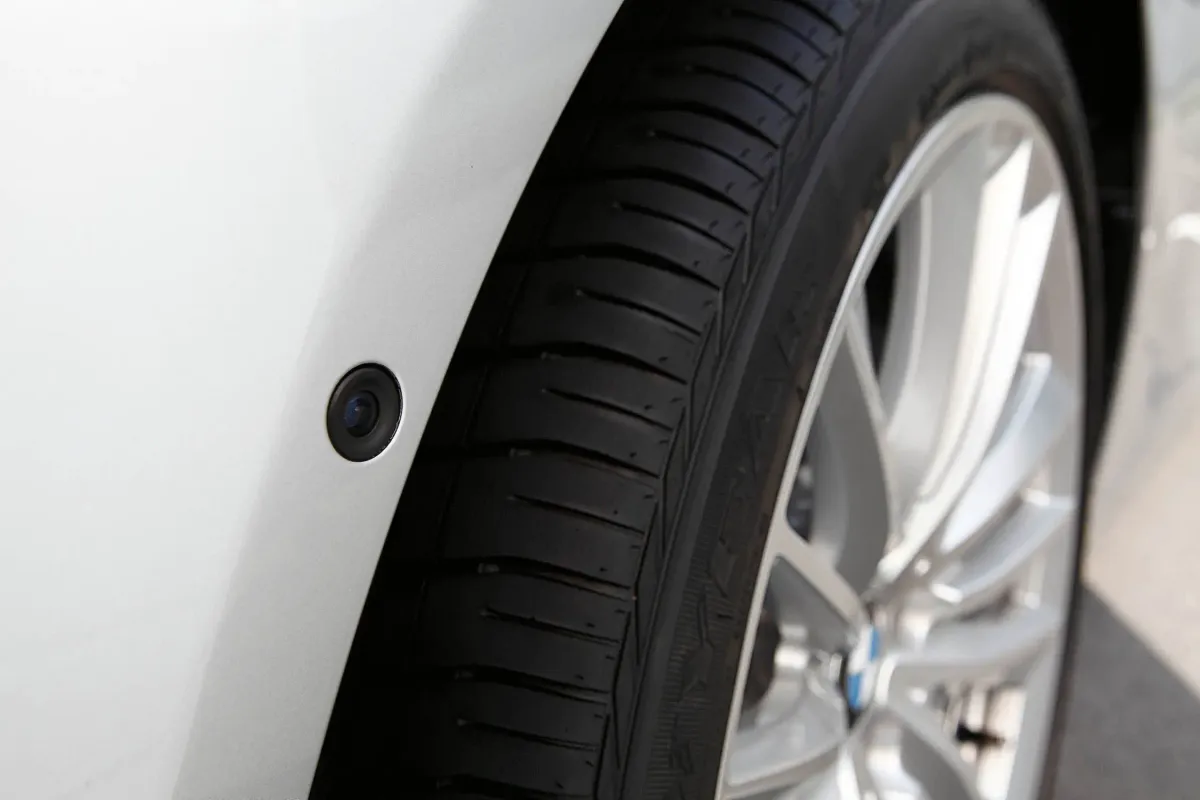
Imagine this scenario: You're inching your BMW out of a tight alley, or perhaps pulling out from behind a high wall. You lean forward, trying to catch a glimpse of oncoming traffic, but it's a risky game of peek-a-boo.
This is where your side view camera shines, giving you eyes right on the front bumper to safely navigate. But then, out of the blue, Gong!
Side view camera malfunction.
Enter the silent saboteur: corrosion in the LVDS cables and connectors. This unwelcome guest is often the culprit behind your camera’s abrupt vacation.
Now, you'd think the right thing to do would be to inspect the outside for any visible damage.
But here's the kicker: you can't spot this treachery from the exterior, not even on the connector pins. It's like a stealthy ninja, lurking in the shadows.
And if you're looking to point fingers at which camera usually goes rogue first, it's the left bumper camera. Why? It’s like the eldest sibling—bearing the brunt of everything because its connection line to the TRSVC control unit is the longest. So, a word to the wise: When troubleshooting, give that left LVDS cable a stern look first.
Stay with me as we dive deep into the world of BMW camera troubleshooting. No jargon, no fluff—just straight-up, practical solutions to get you back on the road with confidence.
Why Does This Happen? Unmasking the Culprit Behind Your Camera's Rebellion
So, you might be wondering: "Why, oh why, did my trusty BMW's side view camera forsake me?"

Let's uncover this mystery together.
The Sneaky Intruder: Water
Picture this: A small droplet of water, seemingly harmless, finds its way into the LVDS data line.
Over time, this minuscule trespasser becomes the root of all your camera woes.
While water might be essential for our morning coffee or evening tea, it's the nemesis of electronics.
Once inside, it begins its sinister work—corroding the internal parts.
The Deceptive Exterior
Now, if you're anything like me, the first instinct is to give the cables and connectors a good old visual inspection. But here's the catch: corrosion, much like a well-played game of hide and seek, doesn't reveal itself easily. Even if you scrutinize those connector pins with a detective's magnifying glass, chances are, you won't spot the damage. It's a sly adversary, hiding just beneath the surface, waiting to catch you off guard.
A Curious Bias
Remember our left bumper camera – the one that's often the first to wave the white flag? The reason it's more susceptible isn't personal vendetta or bad luck. It simply has the longest line connecting it to the TRSVC control unit. In the world of electronics, longer lines mean more opportunities for moisture to creep in and wreak havoc.
To sum it up: moisture, coupled with deceptive appearances and the left camera's extended connection, is the treacherous trio behind your BMW's camera malfunction. But fret not! Armed with this knowledge, you're one step closer to setting things right.
A Real-World Troubleshooting Approach: Ditch the Manuals and Dive into Action
BMW's official procedure for diagnosing camera issues could rival the length of classic novels, and let's be honest, you're not looking for a bedtime story.
Instead, you need a straightforward, no-nonsense method to reclaim your car's visual prowess. Let's get down to brass tacks.
A Quick & Temporary Fix (But Not a Solution)
You might've heard whispers in the BMW community: "Just unplug and plug the camera connector back in. Works like a charm." Sure, it might give you a fleeting moment of triumph, but here's the cold, hard truth: it's a temporary Band-Aid.
The real culprit? That pesky LVDS cable. So, if you're in for a quick fix, by all means, give it a shot. But remember, it's like putting off an inevitable dentist appointment – you're going to have to face it sooner or later.
Diving Deeper: The Diagnostic Dive
Before rolling up your sleeves, take a moment to assess. The approach you take will depend on the symptoms:
One Camera's Gone MIA

If one camera gives you the cold shoulder while the other's still in action, there's a trick to pinpoint the issue. The idea is simple: swap the cameras. If your left camera's acting up, plug it into the right-side connector. If it springs back to life, your camera isn’t the traitor – the cable is.
Both Cameras on Strike

A double camera malfunction is like spotting a unicorn – rare but not impossible. If you find yourself in this unlucky camp, arm yourself with a working LVDS cable. With a bit of swapping and testing, you can identify whether you're dealing with a dual-camera mutiny or a cable conspiracy.
Camera's Working, But There’s a Glitch

Sometimes, the camera shows the view but still raises a red flag. In this case, it's a tug-of-war between the image transmission and the communication signals. One's working, the other's not. And if you leave it be, brace yourself for a total blackout in the near future.
In the world of BMW troubleshooting, knowledge is power. And now that you're equipped with the basics, you're ready to reclaim your car's side view supremacy.
System Snapshot: Unraveling the Colorful Web of Connections
Navigating the TRSVC control unit can feel like decoding a modern art masterpiece.
With a palette of colored connectors and pins, it's easy to get lost. But fear not – consider this your guided museum tour through the intricate artwork of your BMW's camera system.
The Colorful Cast of Connectors
Each connector color tells a story, representing a specific part of your BMW's visual system:
- WHITE: The protagonist - the front left bumper camera.
- GREEN: Its twin - the front right bumper camera.
- BLUE: The backup singer - the rear view camera.
- RED: The right-hand man - the right mirror camera.
- BLACK: The left-hand confidante - the left mirror camera.
Pin Assignments: The DNA of Your Camera System
Like a cast of characters in a play, each pin on your connector has a role to play:
- Voltage (U): Powers up the bumper camera and its heating system.
- LIN: The communicator - the local interconnect network bus line.
- LVDS+: The signal bearer, part one.
- LVDS-: The signal bearer, part two.
- Shield: The protector - shielding the system from interference.
In essence, understanding your BMW’s camera system is like appreciating a beautifully choreographed dance.
Each component, color, and pin has a role, working in harmony to give you a seamless visual experience.
With this newfound appreciation, you're not just a driver, but a connoisseur of automotive art.
Replacing the Side View Camera Cable: Your Step-by-Step Dance Routine
When your side view camera throws a tantrum, sometimes the only solution is to change its tune.
Think of this as choreographing a new dance routine for your BMW.
It might seem daunting at first, but with the right steps (and a pinch of grace), you'll have it performing flawlessly in no time.
Setting the Stage
Before diving into the steps, make sure you have your props ready. This means having the necessary tools, a new LVDS cable, and perhaps a calming playlist in the background.
Act 1: Gaining Access
- Remove the front wheel arch cover like you'd unveil a grand stage.
- Disengage the sealing mount for the engine compartment lid—think of it as adjusting the backdrop.
- Access the all-round vision camera control unit. It's like tuning the orchestra pit.
Act 2: The Main Performance
- Remove the driver’s seat. Yes, it's drastic, but sometimes you need space to perform.
- Slide away the backrest side section on the rear seat backrest. Consider it as making room for the main dancers.
- Gently remove the bottom trim panel for the door post. It's all about setting the right ambiance.
Act 3: The Finishing Touches
- Carefully unlock the lock with a tool, like a maestro wielding a baton.
- Attach the repair cable to the Side View camera. This is the duet you've been waiting for.
- Lay and secure the repair cable along the wiring harness. Imagine it as synchronizing the dance moves.
Encore: A Few Pro Tips
- While you're in the groove, ensure the repair cable is fed through cautiously to avoid damage.
- Always mask the grommet with adhesive tape after securing the repair cable—it's like putting the finishing touch on a performance.
- Lay and secure any extra length of the repair cable below the wheel arch trim panel. Think of it as tidying up after a show.
By the end of this routine, your BMW's side-view camera should be back in rhythm, ready to dance through traffic with grace and precision.
Take a bow, maestro; you've orchestrated a masterful performance!
Navigating the Visual Journey of Your BMW
From the quiet sabotage of corrosion to the intricate dance of cable replacements, the journey through your BMW's side-view camera system has been nothing short of enlightening. We've delved deep into the heart of malfunctions, danced through troubleshooting ballets, and even ventured off the beaten path into the land of alternatives.
What we've learned is that every component, from the tiniest pin to the most intricate cable, plays a pivotal role in ensuring your BMW gives you a clear view of the world. It's a delicate symphony of technology and engineering that, when in harmony, offers unparalleled safety and convenience.
But like any sophisticated system, hiccups are bound to happen. Armed with the knowledge from this guide, you're no longer a mere spectator but a maestro, ready to orchestrate your BMW's visual masterpiece back to perfection.
So, the next time your side view camera decides to take an unexpected intermission, remember this guide. Approach the issue with confidence, knowledge, and a touch of flair. After all, every great performance deserves an encore.
Drive safe, stay clear, and keep those cameras rolling!


